实现 Redux (二)
添加中间件机制

前言
上一篇 我们已经实现了 Redux 最基本的机制,这次我们会添加中间件机制,之后我们还会手写两个中间件。
体验官方中间件机制
安装 thunk 和 logger 中间件:
pnpm i redux-thunk redux-logger我们切换回官方的 redux,由于我们之前的实现和官方库是一致的,所以只需改一下引用 createStore 的代码即可执行切换:
import {createStore} from "redux"; // [!code  ++]
import {createStore} from "../mini-redux"; // [!code  --]

function counterReducer(state = 0, action) {
  switch (action.type) {
    case "ADD":
      return state + 1;
    case "MINUS":
      return state - 1;
    default:
      return state;
  }
}

export const store = createStore(counterReducer);添加并应用中间件:
// import {createStore} from "../mini-redux";
import {applyMiddleware, createStore} from "redux";
import thunk from "redux-thunk";
import logger from "redux-logger";

function counterReducer(state = 0, action) {
  switch (action.type) {
    case "ADD":
      return state + 1;
    case "MINUS":
      return state - 1;
    default:
      return state;
  }
}

export const store = createStore(counterReducer, applyMiddleware(thunk, logger));可以看出应用中间件需要实现 applyMiddleware 方法。
thunk 中间件的作用是帮助我们支持异步 action。
之前,如果我们需要异步地执行变更应用状态,我们需要这么写:
setTimeout(() => {
  store.dispatch({ type: 'ADD' });
}, 1000);使用了 thunk 之后,dispatch 将会支持函数,函数里可以有异步的逻辑,当然它并不破坏原本的写法:
store.dispatch((dispatch) => {
  setTimeout(() => {
    dispatch({ type: 'add' })
  }, 1000);
});我们不妨添加 2 个异步 action 帮助理解第二种写法的好处:
export const add = () => {
  return {
    type: 'ADD'
  };
};

export const minus = () => {
  return {
    type: 'MINUS'
  };
};

export const addAsync = () => {
  return (dispatch) => {
    setTimeout(() => {
      dispatch(add());
    }, 50);
  };
};

export const minusAsync = () => {
  return (dispatch) => {
    setTimeout(() => {
      dispatch(minus());
    }, 50);
  };
};import {useEffect, useState} from 'react';
import reactLogo from './assets/react.svg';
import viteLogo from '/vite.svg';
import './App.css';
import {store} from "./store/index.js";
import {add, addAsync, minus, minusAsync} from "./store/actions.js";
function App() {
const [, forceUpdate] = useState(0);
const handleAdd = () => {
store.dispatch(add());
};
const handleMinus = () => {
store.dispatch(minus());
};
const handleAddAsync = () => {
store.dispatch(addAsync());
};
const handleMinusAsync = () => {
store.dispatch(minusAsync());
};
useEffect(() => {
const unsubscribe = store.subscribe(() => {
forceUpdate(v => v + 1);
});
return () => unsubscribe();
}, []);
return (
<>
<div>
<a href="https://vitejs.dev" target="_blank" rel="noreferrer">
<img src={viteLogo} className="logo" alt="Vite logo" />
</a>
<a href="https://react.dev" target="_blank" rel="noreferrer">
<img src={reactLogo} className="logo react" alt="React logo" />
</a>
</div>
<h1>{store.getState()}</h1>
<div className="card">
<button onClick={handleAdd}>
Add
</button>
<button onClick={handleMinus}>
Minus
</button>
<button onClick={handleAddAsync}>
Add async
</button>
<button onClick={handleMinusAsync}>
Minus async
</button>
<p>
Edit <code>src/App.jsx</code> and save to test HMR
</p>
</div>
<p className="read-the-docs">
Click on the Vite and React logos to learn more
</p>
</>
);
}
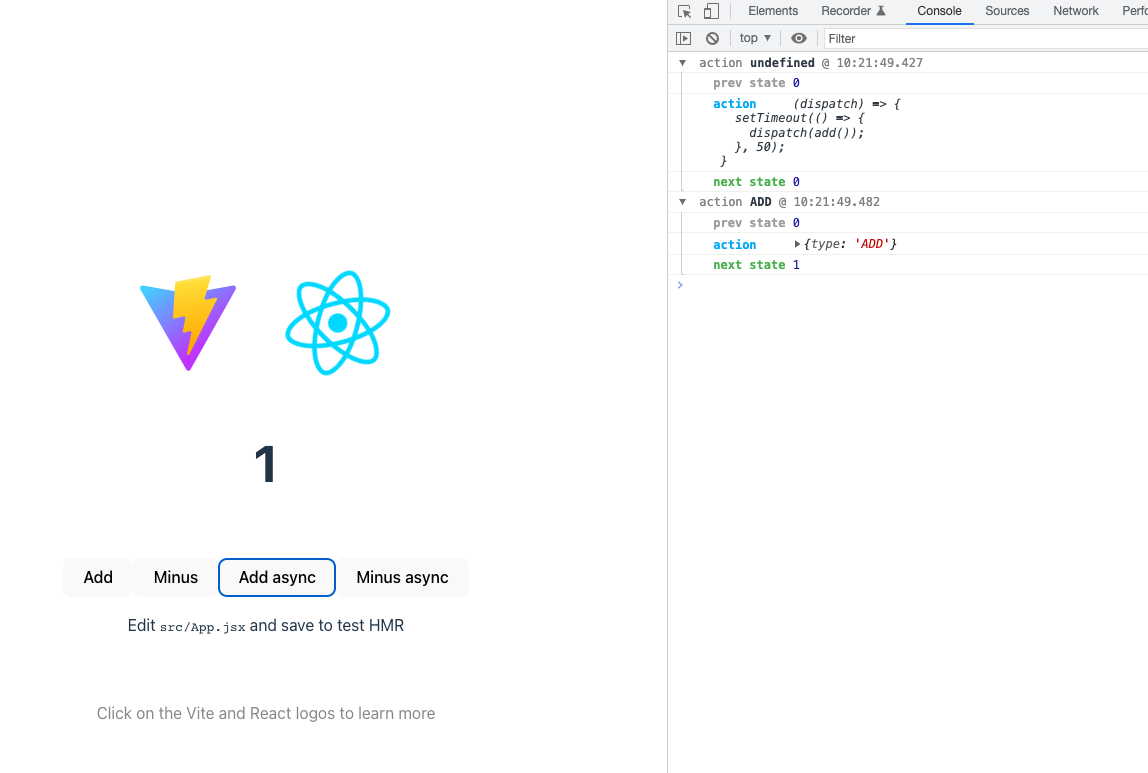
export default App;你可一看到,支持了异步的 action 后,我们将创建 action 的方式移到独立的文件后,调用方调用同步或异步的 action 的方式是完全一样的,这就是它的好处。
可以从图中看出,我们的两个中间件已经正确配置了,支持了异步 action 和能够记录 state 变化的日志。
了解 applyMiddleware 的顺序
如果我们变更了 applyMiddleware 里的参数顺序:
// import {createStore} from "../mini-redux";
import {applyMiddleware, createStore} from "redux";
import thunk from "redux-thunk";
import logger from "redux-logger";

function counterReducer(state = 0, action) {
  switch (action.type) {
    case "ADD":
      return state + 1;
    case "MINUS":
      return state - 1;
    default:
      return state;
  }
}

export const store = createStore(counterReducer, applyMiddleware(logger, thunk));我们会发现,logger 的执行并不正常,它会输出两次,其中第一次记录了异步 action 的操作,这是我们不期望的,如图中所示:
由此可见 applyMiddleware 对传入中间件的顺序是有要求的,这就涉及到其内部函数 compose 的实现了,力扣有一个相关的题,我也写过相关题解可以参考。
实际上 redux 的中间件大多都是为了改造 dispatch 函数,logger 中间件是在其前后分别获取 state 后做打印,thunk 则是让其支持函数形式。
所以我们应用了中间件的最后 dispatch 最后是这样子执行的 dispatch = thunk(logger(dispatch)), 最右边的中间件会先执行,由于执行 thunk 后,dispatch 变成支持异步的了,它可能是个异步的 dispatch,如果我们是 dispatch = logger(thunk(dispatch)),logger 就有可能不能正常工作。
实现 applyMiddleware
export { default as createStore } from "./createStore.js";
export { default as applyMiddleware } from "./applyMiddleware.js";export default function compose(...fns) {
return fns.reduceRight((a, b) => (...args) => b(a(...args)));
}import compose from "./compose.js";
export default function applyMiddleware(...middlewares) {
return createStore => (reducer, preloadedState) => {
const store = createStore(reducer, preloadedState);
let dispatch = store.dispatch;
const middlewareAPI = {
getState: store.getState,
dispatch: (action, ...args) => dispatch(action, ...args),
};
const chain = middlewares.map(middleware => middleware(middlewareAPI));
dispatch = compose(...chain)(store.dispatch);
return {
...store,
dispatch,
};
};
}export default function createStore(reducer, enhancer) {
if (enhancer) {
return enhancer(createStore)(reducer);
}
let state;
let listeners = [];
function getState() {
return state;
}
function dispatch(action) {
state = reducer(state, action);
for (let effect of listeners) {
effect();
}
}
function subscribe(effect) {
listeners.push(effect);
return function () {
const idx = listeners.indexOf(effect);
if (idx >= 0) {
listeners.splice(idx, 1);
}
};
}
dispatch({ type: Math.random().toString() });
return {
getState,
dispatch,
subscribe,
};
}添加上方的代码后,我们可以将 redux 切换为我们自己的 min-redux,这个时候,我们的 redux 应当能够正确地使用 thunk 和 logger 中间件。
我认为不太好理解的代码处,我已经高亮了,下面来讲解一下。
redux 的中间件实际是一个创建中间件的函数,它需要我们将诸如 getState 和 dispatch 函数传给它后,所以我们传递了一个包含它们的结构 middlewareAPI 来创建真正的中间件。
dispatch: (action, ...args) => dispatch(action, ...args),这一行的目的是为了不让 dispatch 是一个固定的初始 dispatch,采用函数的形式,因为 dispatch 可能会被中间件改变,每个中间件执行时,是执行最终加强过的 dispatch,它最后会被下面的 compose 函数调用中间件后修改。
可以想象一下,如果只是传给了 middlewareAPI 的是 dispatch: dispatch,这个是固定的我们初始化的 dispatch,即初始的只支持传给它对象的 dispatch,那么,我们的中间件不是不起作用了吗?实际上,在我们的例子里,如果我们修改成这样,会发现异步 action 时,无法打印出日志,下篇我们手写中间件时分析一下此现象。
compose 则是一个能够让中间件从右向左执行的代码,我这里使用了 reduceRight 来实现,这和官方的实现右略微的区别,具体可以参考我之前提到的这一篇。
createStore 现在支持了第二个参数,我们取名叫 enhancer,它是 applyMiddleware 的执行结果,目的正式为了增强,命名非常的贴切。它有点柯里化的意味,我们在增强后再创建我们的 store:enhancer(createStore)(reducer)。
总结
至此,我们给我们的 min-redux 添加了中间件机制,它能够应用 redux-thunk 和 redux-loggeer 中间件了,下一篇我们会实现自己的这两个中间件。